
***
In Amigurumi Workshop series I told you already about the other projects by LOH, and about my projects. If you would like to watch the videos, go to my playlist - there are separate playlist for Amigurumi Workshop in English and Polish.
As for LOH I've made: Shih-tzu puppy, Dolly the Sheep, Mouse Sofia, Cute Owl, Jeremy the Cat, Cute Little Pig, Cheerful Santa, Horse White Dream, Cuddly-Wuddly Dog. I also translated the patterns into Polish.
Within the projects based on my pattern you can watch: Pinocchio, Bears in Love (pattern is here), The Cuties (part 1), Rufus & Rafija (pattern available here), Star Love, Busy bugs and Thomas from Thomas and Friends.
***
Now I give you some info about the pattern Little Fox Lizonka.You can watch the video about the Lizonka here (click below):
Designer: Svetlana Pertseva
Skill level: Experienced
Materials
The designer used the main yarn: acrylic 350m/100g, crochet hook 1.75mm
I used:
- YarnArt Jeans – dark beige no 7 (main yarn); for the shoes: black (for the sole), light grey no 49, antique rose no 65,
- YarnArt Mink, grey no 335 – BTW, I used the yarn for Sophia the owl in my Cuties series.
- Crochet hook: 2 mm for YAJ and 2.5 mm for YAMink
- For the sweater: Drops Baby Merino mix no 34 (heather color). I knitted with 2 strands of yarn, knitting needles 3mm.

***
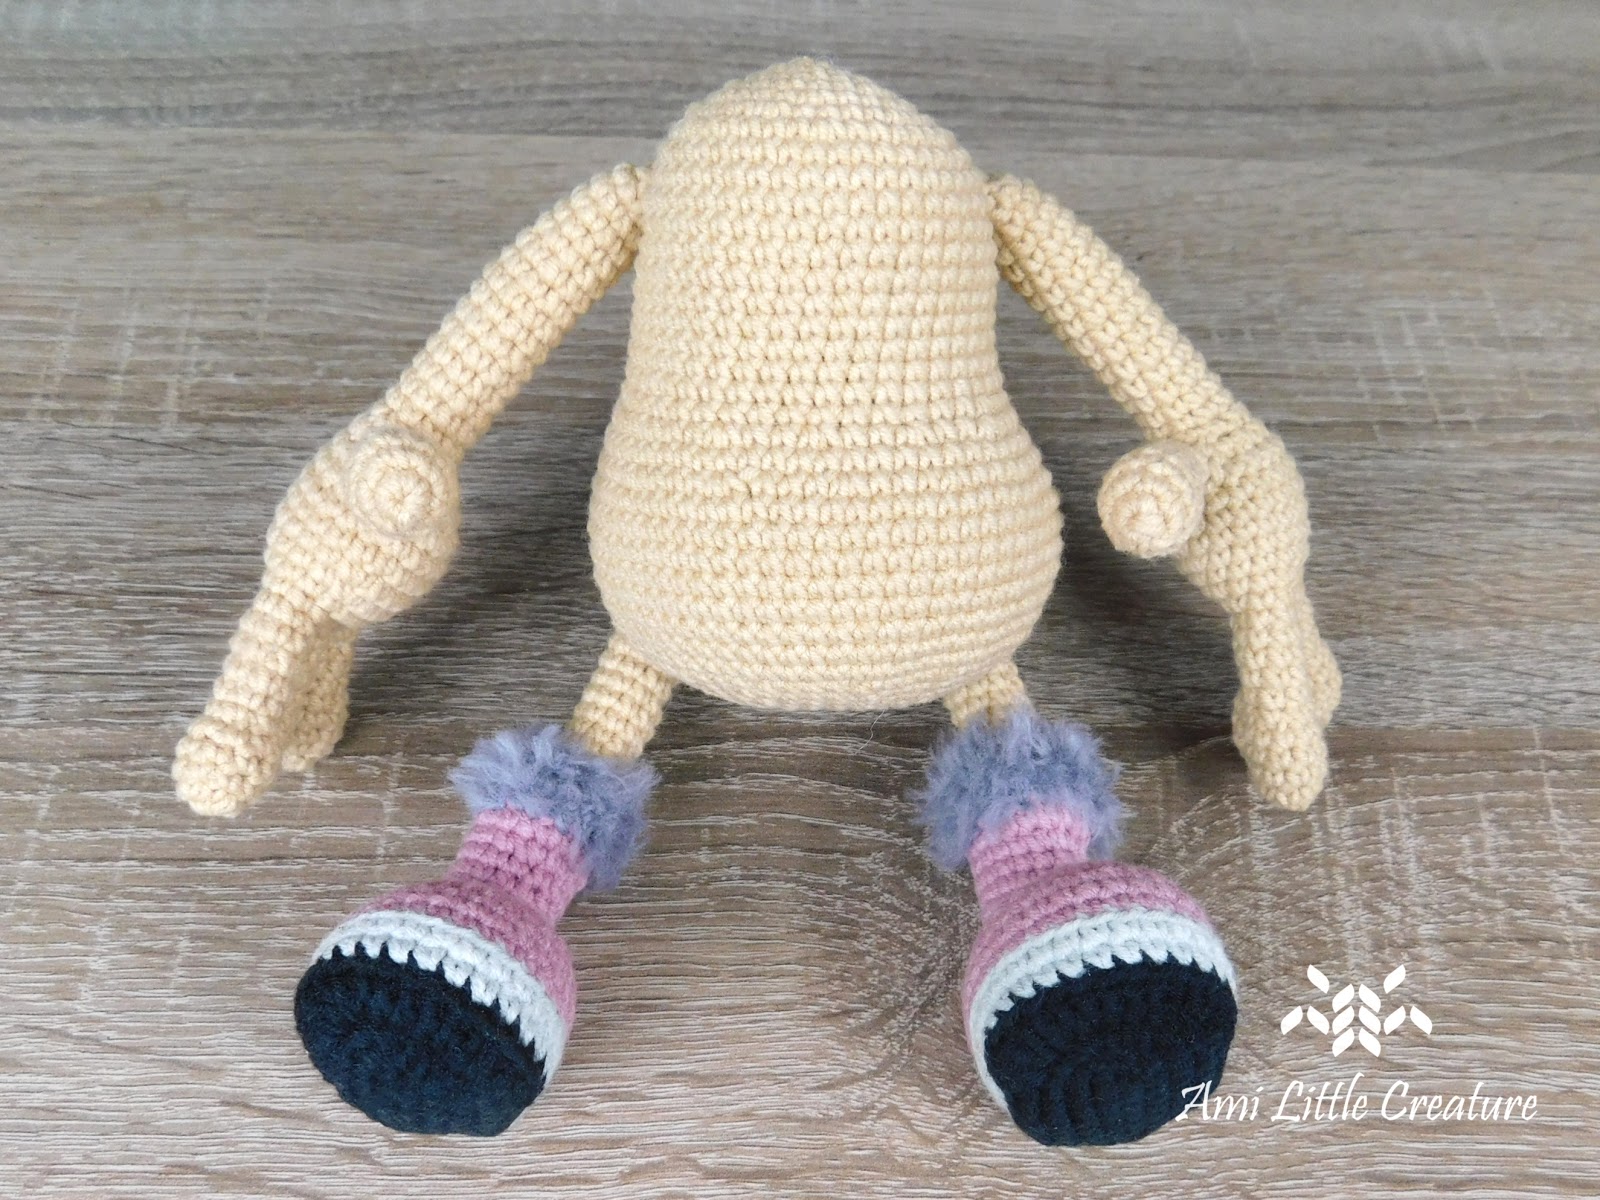
I started from FINGERS & ARMS – I crocheted thumb and 3 fingers for each hand.
In the pattern the designer inserted the wire frame into the hand and crocheted around it. I didn’t use a wire frame (because the toy is a gift for a child). Instead of the wire I added stuffing gradually.


The next part was THE SHOES & LEGS – they are crocheted in one piece.
I made the black sole with YAJ, then changed to light grey, antique rose and finally - fluffy grey YarnArt Mink.
I cut the plastic insole & inserted it inside the shoe.
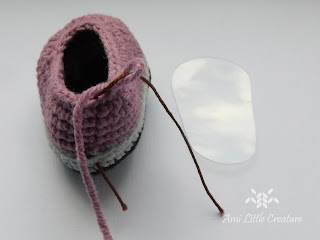


Then I continue the leg with the main beige yarn.
In the pattern the legs are crocheted with the wire but I didn’t use the wire.
If you use the wire, follow the instructions in the pattern. It is clearly explained how to use the wire. Ends of the wire should be wrapped around with fabric or electrical tape in order to secure them.


As for the BODY - stitch marker goes along the center back of the body.
I had to make shift stitches – they are mentioned in the pattern.
I marked the holes for the arms and legs (pink markers on the photo below; in the pattern there is left space of ch 1 for the wire).

 If you use the wire, you should put it from the arms & legs into the holes, twist the pieces of wire inside the body and secure the ends with the tape. Don't forget to stuff the body before you close the opening.


The next thing - I marked the TAIL (between rnds 29-30 – orange marker on the photo above). I crocheted the tail later onto the body. You may also crochet it separately and sew it to the body.
HEAD – the marker goes along the top of the head, from the nose, so it is necessary to make shift stitches.
I added markers for the eyes & neck, but I had to adjust the markers for the neck before I started needle sculpting (the neck markers were a bit shifted regarding the eyes) – perhaps it was just my toy and it will be OK with yours.
I planned to add safety eyes before I close the opening, so I needle sculpted the head (the eye sockets and mouth) to insert safety eyes. I used 12 mm safety eyes.
In the pattern the needle sculpting is made after crocheting the head and then the designer attached the eye with the glue.


EARS
Before I started the ears, I divided the head symmetrically in half and sketched both ears with pins (I counted from the yellow pin - you can watch in my video). Everything is clearly described in the pattern on the diagrams. You shouldn’t have any problems with the ears, but they are not so easy to do. Firstly, it is better to crochet the first round for both ears to check if they are placed in the right position.
You may also crochet the ears separately and sew them to the head. I definitely prefer to crochet onto the head, not separately, because I avoid sewing if it is not necessary.
 |
| The first row of right ear |
The ears look similar to the Jeremy the Cat (also designed by Svetlana Pertseva) and the way of crocheting is quite similar.
LIPS and EYEBROWS
Lips are made in two versions (v1 - on the left, v2 - on the right):
 I prefer the first one (left).

I was thinking about using the eyebrows for the eyelids (to cover the safety eyes a bit) and finally I did it and I embroidered the eyebrows with a black thread.
 |
| The eyebrows regarding the pattern (I used them as eyelids) |
SWEATER
In the pattern there is knitted and crochet version for sweater. I prefer knitted sweater.
To knit the sweater it is good to know how to make: knit, purls and cables. Knitting in the round with double-pointed needles is also useful.
I used Yarn Drops Baby Merino – 2 threads, knitting needles 3 mm. I chose the yarn because I like the heather color and it suits the antique rose shoes, I think.
I adjusted the pattern – my ribbing is longer (8, not 4 rows), my front and the back parts include approx. 20 rows and they have almost the same numbers of stitches in the row. The front part is less 5 stitches from both sides, so I had 32 stitches in the row, not 42 as it was stated in the pattern.
I sewed the shoulder seam (the front and the back) and started the sleeves.
 |
| The front part |
 |
| The front and the back - shoulder seam |
In the pattern the sleeves were knitted separately and then sewed. I don’t like sewing, so I picked up the stitches directly onto the edges, inserting the needle along the edge (firstly I counted 10 sts from both sides of the seam).


Collar – I picked up the stitches around the neckline. I used double-pointed needles and I knitted in the round.
Finally I casted off and crocheted the edging with YarnArt Mink. I think this little detail corresponds with the shoes perfectly.


After making the video I made crochet sweater to check the translation into Polish (I always crochet the toys if I translate the patterns). I attach the photos below.
 ==
==
UPDATE (5th March 2020): recently I got the message from Sabax on Ravelry that I attached the sleeves wrong - the 12 ch I started with should be around the wrist. You see on the photo above that my fox has got flare/bell sleeves :) So pay attention to that and if you don't want to make flower children outfit for your fox, sew the sleeves reversely (narrow part around the twist) :)
==
So all the parts were ready and I had to assemble them.

Size of particular parts
Look at the tape measure I'm using in the video - I found it in JUNE KnitCrate Membership - watch the unboxing ;)
- head (without the ears) = 8 cm / 3.14"
- shoes & legs = 10 cm / 4"
- sole (shoe) = 5 cm / 2"
- body = 9.5 mm / 3.74"
- finger = 3 cm / 1.18"
- arm = 11,5 cm / 4.5" (with a hand) and 5 cm / 2" (without the hand)
What was next?
1. I crocheted the right ear and the tail.
2. I sewed the sleeves and the sides of the sweater.
3. I assembled arms and legs to the body (regarding the pink markers), put the sweater and sewed the head to the body.


3. I assembled arms and legs to the body (regarding the pink markers), put the sweater and sewed the head to the body.


4. I finished face details: I sewed the lip and eyelids, I embroidered the eyebrows (with a black floss) and the nose. If you like you may shape the nose with the polymer clay and bake in the oven or add the ready-made nose.
I glued eyelashes - cut a piece of black felt and glue the false eyelashes, then glue the felt into the inner part of every eyelid.
I needle felted the whites around the eyes and pink tongue inside the mouth.

 5. I sewed decorative buttons - ladybug (to the sweater) and little butterfies (to the shoes).


6. Finally I tinted the ears a bit and blushed the cheek.
The fox without the ears is approx. 26 cm / 10.26" tall, so the size is quite similar to the original toy (25 cm)I glued eyelashes - cut a piece of black felt and glue the false eyelashes, then glue the felt into the inner part of every eyelid.
I needle felted the whites around the eyes and pink tongue inside the mouth.


6. Finally I tinted the ears a bit and blushed the cheek.
What do you think of Lizonka?


I hope my video is useful for you. I would be grateful for thumbs up, if you like and subscribe the channel :)
All the best!
All the best!
Komentarze
Prześlij komentarz