
FREE pattern for my the doll named "Cherry Lily". Before you start crocheting, watch the video about the doll on my YouTube channel. The video includes the tutorial for the eyes, the bow and how to attach the hair. If you like my video, please give me thumbs up / subscribe my channel / leave a comment. It makes me feel motivated to further work when I know you appreciate my crochet activity.
Have a nice crocheting! :)
If you would like the pattern in PDF file, you may purchase it for 4 USD. Please mail me: amilittlecreature@gmail.com
Watch the video:
Materials:
yarn Himalaya Dolphin Baby (crochet hook 4 mm):
- apricot no 333 - 2 skeins
- red no 318 - for the dress & shoes - 1 skein
YarnArt Jeans (crochet hook 2 mm):
- black, white and blue for the eyes
- red no 51 - for embroidering the mouth
Amisia by AmiCrafts - mint color for the dress (crochet hook 4 mm for sleeves & panties;
2,5 mm for the flower belt)
Gazzal Baby Cotton XL - yellow no 3413XL for hair, 2 skeins
***
The size of finished doll:approx. 40 cm / 15.74 inches tall
ABBREVIATIONS:
• st = stitch
• sl st = slip stitch
• ch = chain
• tch = turning chain (at the end of a row)
• sc = single crochet
• dc = double crochet
• hdc = half double crochet
• inc = increase (2 sc in one st)
• dec = decrease (sc2tog)
• (..) = repeat the pattern particular number of times
• [..] = complete number of st in the round / row
• rnd = round
• color – change the color of yarn (before you crochet the next stitches)
MR - magic ring (instead of MR you may work ch 2, then insert the hook in the first chain and work scs)
***
Shoe / LEGS
Start with red Himalaya Dolphin Baby, crochet hook 4 mm.
Firstly crochet the left leg (I) and cut the yarn. Then crochet the right leg in the same way (II) but don't cut the yarn because you will join both legs.
Rnd 1: ch 8, insert the hook in 2nd chain from the hook and work: 5 sc, 1 hdc, 5 hdc in the last chain, then crochet on the other side of the chain: 1 hdc, 5 sc [17]
Rnd 2: inc, 5 sc, 5 inc, 5 sc, inc [24]
Rnd 3: 24 sc in back loop only (BLO) [24]
Rnd 4: 7 sc, (1 sc, inc) x 5, 7 sc [29]
Rnd 5: 7 sc, (2 sc, inc) x 5, 7 sc [34]
Rnd 6: dec, 30 sc, dec [32]
Rnd 7: dec, 4 sc, (2 sc, dec) x 5, 4 sc, dec [25]
Insert the sole into the shoe. You may cut it out from the piece of felt.
Start stuffing. Stuff as you go through next rounds.

Change to apricot HDB no 80333:
Rnd 8: BLO, 5 sc, (1 sc, dec) x 5, 5 sc [20]
Rnd 9: 5 sc, 5 dec, 5 sc [15]
Rnd 10: 3 sc, (1 sc, dec) x 3, 3 sc [12]
Rnds 11-16: 12 sc [12]
I work 2 shift stitches to align the marker (the marker should be placed in the centre of the heel; now we work the knee).
Rnd 17: 4 sc, 4 inc, 4 sc [16]
Rnd 18: 2 sl st, 2 sc, 4 dec, 2 sc, 2 sl st [12]
Rnd 19-24: 12 sc [12]


Now join the legs and crochet the BODY.
I work 3 sc to go to the inner side of the right leg (II).
Rnd 25: ch 4 (bridge between the legs), join with the left leg (I) at the inner side, 12 sc (I), 4 sc (bridge), 9 sc (II) [32]


Rnd 26-27: 32 sc [32]
Rnd 28: 3 sc, (1 sc, inc) x 2, 12 sc, (1 sc, inc) x 2, 9 sc [36]
Rnd 29-34: 36 sc [36]
Rnd 35: (7 sc, dec) x 4 [32]
Rnd 36: 32 sc [32]
Rnd 37: (6 sc, dec) x 4 [28]
Rnd 38: 28 sc [28]
Rnd 39: (5 sc, dec) x 4 [24]
Rnd 40: 24 sc [24]
Rnd 41: (4 sc, dec) x 4 [20]
Rnd 42: 20 sc [20]
Rnd 43: (3 sc, dec) x 4 [16]
Rnd 44: (2 sc, dec) x 4 [12]
Rnd 45-47 neck: 12 sc [12]
Next rounds for the longer neck - it will be hidden inside the head to avoid floppy head.
Rnd 48: (1 sc, inc) x 6 [18]
Rnd 49-51: 18 sc [18]
Stuff firmly.
Rnd 52: (1 sc, dec) x 6 [12]
Rnd 53: 6 dec [6]


HEAD
Rnd 1: 8 sc in MR [8]
I start with 8 sc because for the yarn Himalaya Dolphin Baby there is better to have more sc in MR (thanks to that you will have nice flat beginning, not the shape of a cone)
Rnd 2: (1 sc, inc) x 4 [12]
Rnd 3: (1 sc, inc) x 6 [18]
Rnd 4: (1 sc, inc, 1 sc) x 6 [24]
Rnd 5: (3 sc, inc) x 6 [30]
Rnd 6: (2 sc, inc, 2 sc) x 6 [36]
Rnd 7: (5 sc, inc) x 6 [42]
Rnd 8: (3 sc, inc, 3 sc) x 6 [48]
Rnd 9-12: 48 sc [48]
Now marker should go at the center back of the head. Work shift stitches if needed.
Rnd 13: 12 sc, (1 sc, inc) x 6, (inc, 1 sc) x 6, 12 sc [60]
Rnd 14: 28 sc, 2 dec (it is marked in the picture with orange marker), 28 sc [58]
The orange marker is placed between rnds 13-14.
Rnd 15-19: 58 sc [58]
Rnd 20: 12 sc, (dec, 1 sc) x 5, 2 dec, (1 sc, dec) x 5, 12 sc [46]
Rnd 21: (3 sc, dec) x 9, 1 sc [37]
Rnd 22: (5 sc, dec) x 5, 2 sc [32]
Rnd 23: (6 sc, dec) x 4 [28]
Rnd 24: (5 sc, dec) x 4 [24]
Rnd 25: (4 sc, dec) x 4 [20]
Rnd 26: (3 sc, dec) x 4 [16]


Now I sew the head and the neck.
The head has 16 sts in the last round and the neck has 12 sts i the place I sew, so while sewing the head I have to join (2 sts, dec) x 4 to get the same number of stitches equal to the neck.
Stuff before you close the opening.
I use the ladder stitch while sewing the head and the neck. I take the needle out in the first rnd (MR), secure it and hide inside the head.


ARM (make 2)
Rnd 1: 6 sc in MR [6]
Rnd 2: 6 inc [12]
Rnd 3: (1 sc, inc) x 4, 4 sc [16] (4 sc stands for the inner part of the hand while placing the hand)
Rnd 4: 16 sc [16]
Start stuffing.
Rnd 5: (1 sc, dec) x 4, 4 sc [12]
Rnd 6: 12 sc [12]
Rnd 7: (2 sc, dec) x 3 [9]
Rnd 8-19: 9 sc [9]
Rnd 20: (1 sc, dec) x 3 [6]
Add stuffing and close the opening (gather front loops only with a tapestry needle).

EAR (make 2)
Work in rows. Make 1 turning chain in the end of the row and turn.
Row 1: 6 sc in MR [6]
Row 2: 6 inc [12]
Fasten off, leaving a long tail for sewing.
Pin the ears between rnds 14-16 on each side of the head and sew.


EYE (make 2)
WATCH the tutorial for the eye.
YarnArt Jeans; colors: black, blue and white; crochet hook 2 mm.
Rnd 1: black, 6 sc in MR [6]
Rnd 2: 6 inc [12]
Rnd 3: (1 sc, inc) x 6 [18]
In the last sc I change the yarn from black to blue (TIP: change color in the middle of the round).


Rnd 4: blue, (1 sc, inc, 1 sc) x 4 [16]

Rnd 5: white, start above the stitch, where you started rnd 4.

(3 sc, inc) x 3, 3 sc [18] Finish with sl st.

Now work the black eyelashes line:
RIGHT EYE: 3 sl st, 7 sc, 3 hdc, 1 dc


LEFT EYE: ch 3 (= 1 dc), 3 hdc, 7 sc, 3 sl st.


Needle shape the eye sockets at the level of the orange marker.


Eyes are placed 2 rnds above and 2 rnds below the orange marker (sew in the range of 4 rnds).


Distance between the inner corner of the eyes = 6 sts.
Embroider the NOSE:


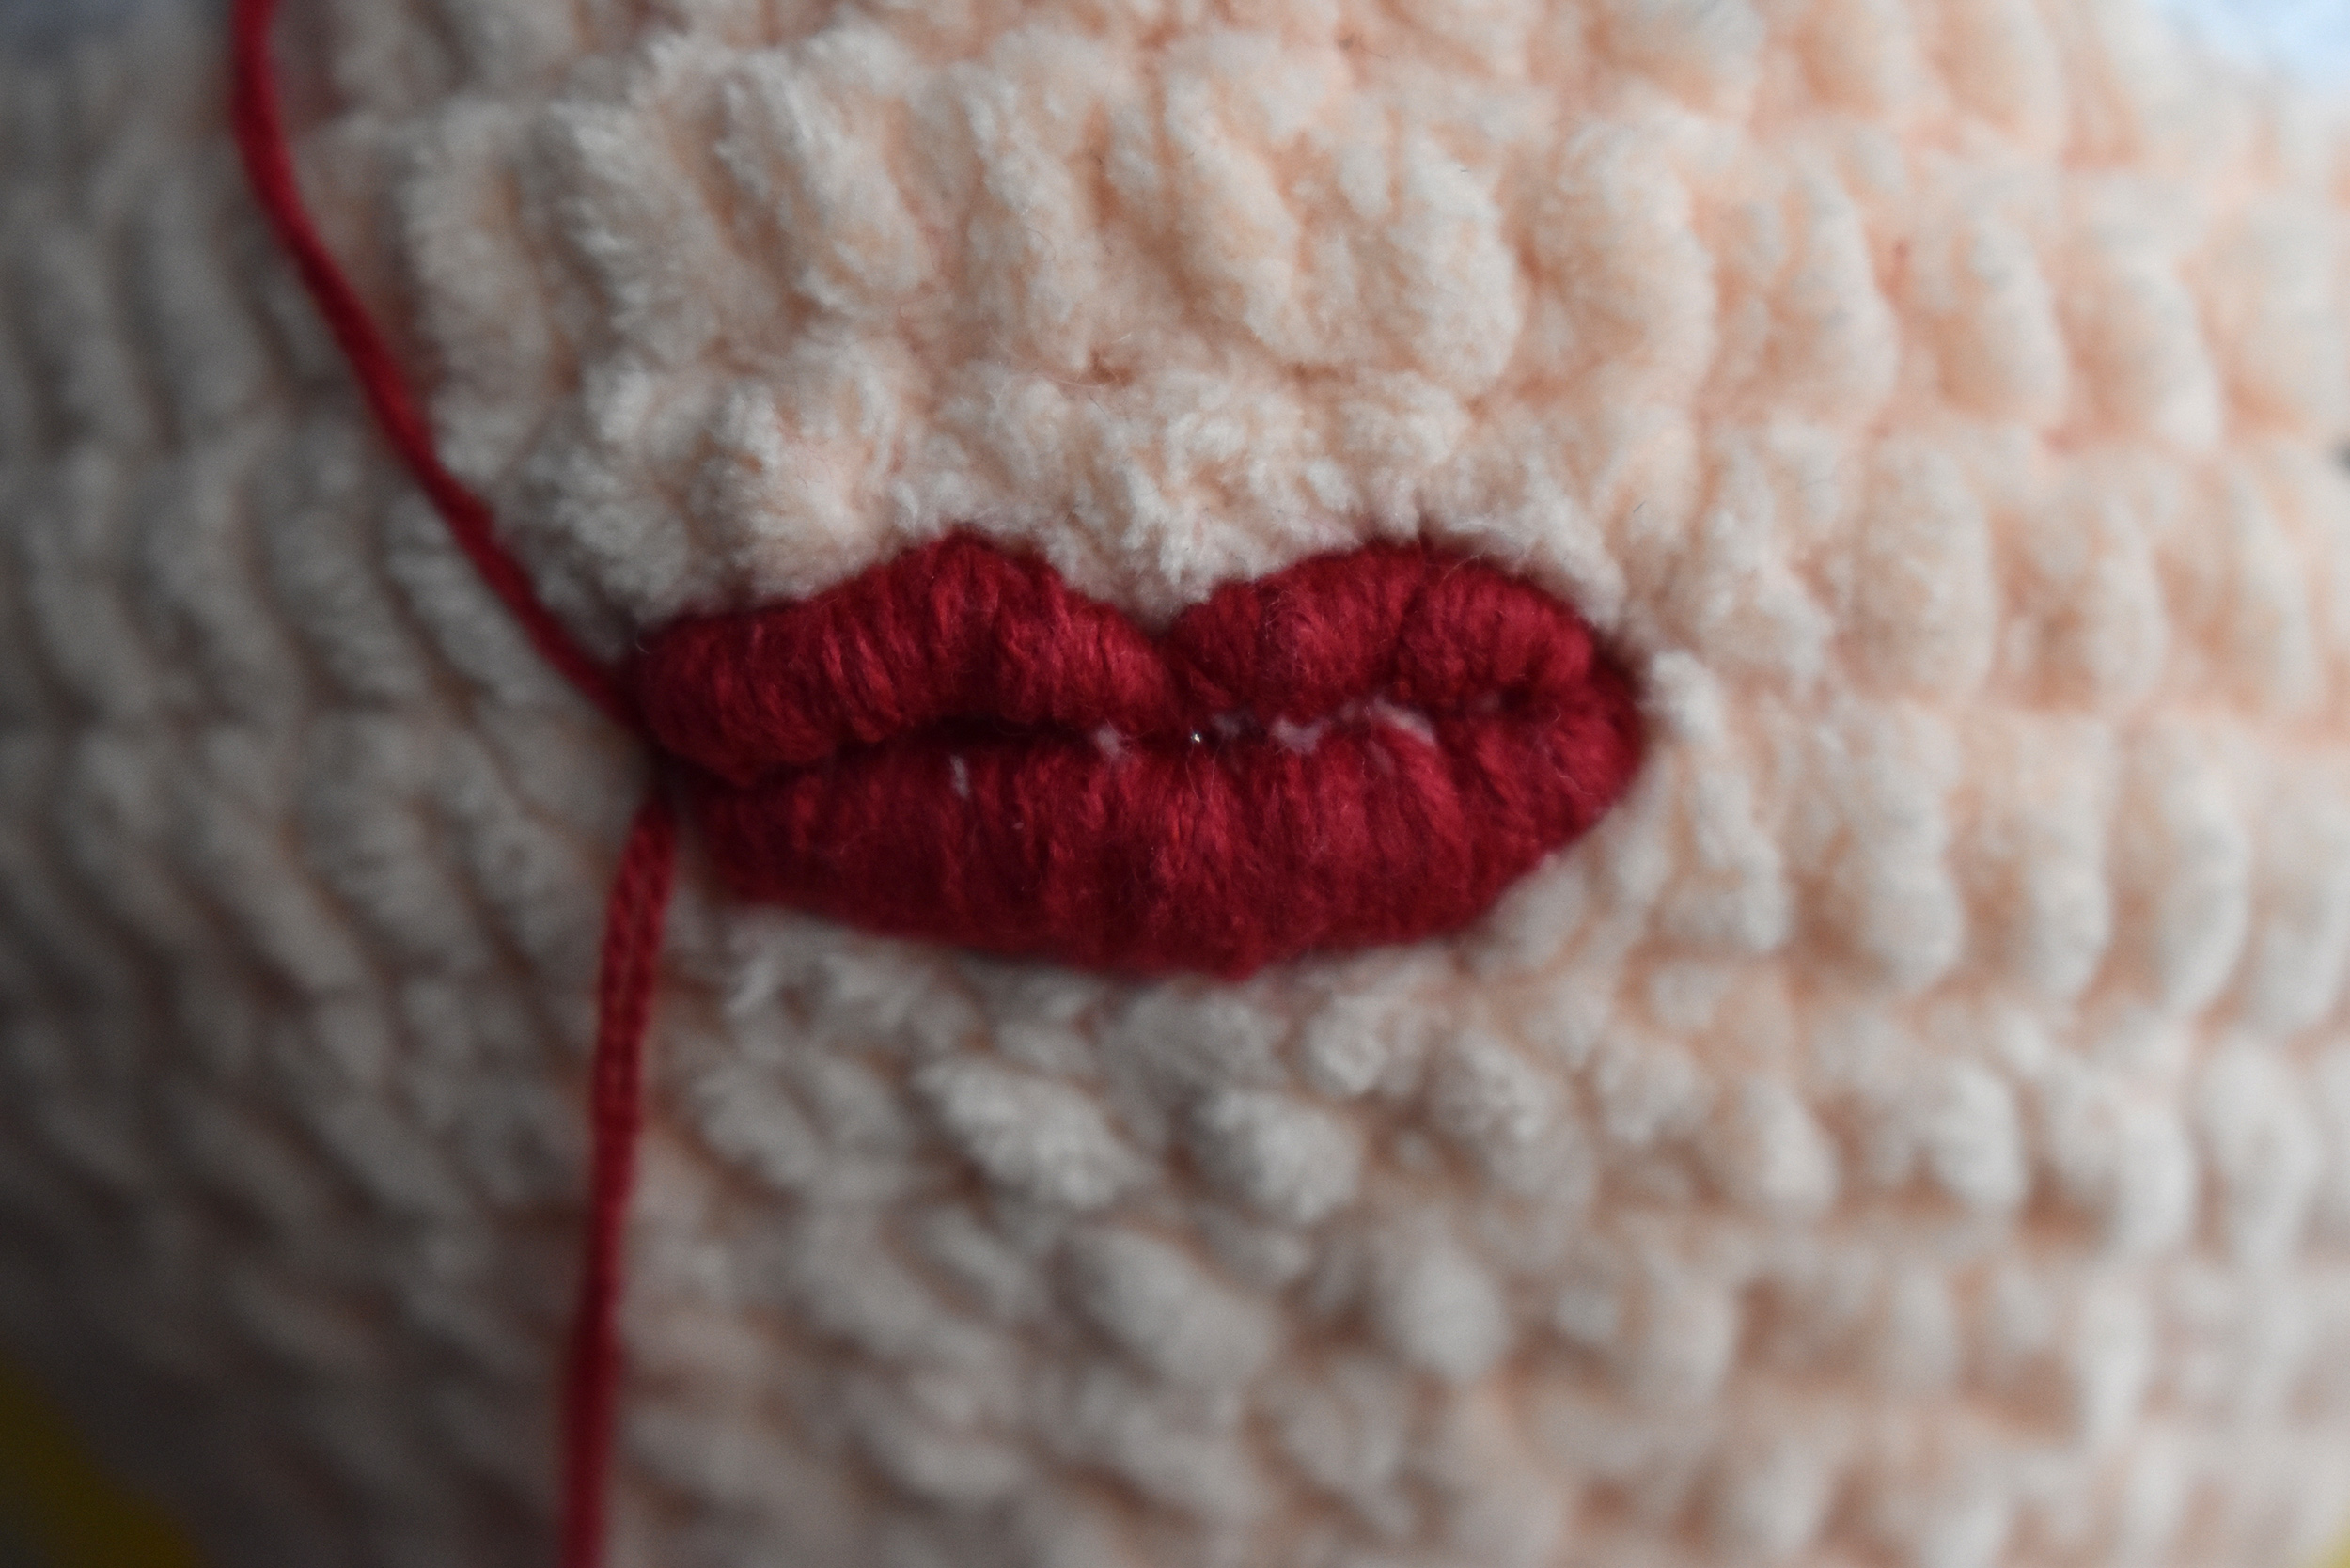
Embroider the MOUTH:


DRESS
Himalaya Dolphin Baby, red, crochet hook 4 mm.
Firstly start crocheting the part from the waist up.
Work in rows. Crochet 1 tch in the end of the row and turn.
Row 1: ch 25, insert the hook in 2nd chain from the hook and work 24 sc [24]
Row 2: 24 sc [24]
Row 3: 4 sc, ch 8 (skip 4 sts), 8 sc, ch 8 (skip 4 sts), 4 sc [32]
Row 4: 32 sc, ch 5 (the button hole - adjust to your button).
Rotate the work 90 degrees and crochet 4 sc on the edge. You go to the bottom and then start crocheting the skirt.


SKIRT
ch 3 (=dc), crochet dc till the end of the row, then work ch 5 (you will get nice triangle-shaped cut on the back) and join with sl st to get a circle.
Now start rnd 1 (pattern for the skirt). In the end of every round make sl st to close the round.
Pattern consists of 6 sts. Repeat the pattern 5 times.
Rnd 1: ch 3 (=1 dc), 2 dc, skip 1 st, (2 dc, ch 1, 2 dc) in one stitch, skip 1 st.
Rnd 2: ch 3 (=1 dc), (2 dc, ch 1, 2 dc) in one stitch, 1 dc, skip 1 st, (3 dc, ch 1, 3 dc) in one stitch, skip 1 st.
Repeat the round 2 till you get the length you want.


Sew the button at the back.
Crochet the flounce on the sleeves with mint yarn Amisia, crochet hook 4 mm.
There is 8 sts along the sleeves, so make the pattern: (2 dc in one st, 3 dc in next st) x 4.
Finish with sl st.


FLOWER BELT
I made the flower belt for the Lady Bear outfit (Bears in Love pattern & tutorial) but I made some adjustments.
I used crochet hook 2.5 mm and the petal pattern is: (ch 2, 1 dc, ch 2, sl st) x 5
I crochet 15 flowers. Then attach the belt in the waist line and sew it.


PANTIES
Yarn Amisia, crochet hook 4 mm.
Work in rows, 1 tch in the end of every row.
Row 1: ch 21, insert the hook in 2nd chain and work 20 sc [20]
Row 2-4: 20 sc [20]
Row 5: dec, 16 sc, dec [18]
Row 6: dec, 14 sc, dec [16]
Row 7: dec, 12 sc, dec [14]
Row 8: dec, 10 sc, dec [12]
Row 9: dec, 8 sc, dec [10]
Row 10: dec, 6 sc, dec [8]
Row 11: dec, 4 sc, dec [6]
Row 12: dec, 2 sc, dec [4]
Rows 13-16: 4 sc [4]
Row 17: inc, 2 sc, inc [6]
Row 18: inc, 4 sc, inc [8]
Row 19: inc, 6 sc, inc [10]
Row 20: inc, 8 sc, inc [12]
Row 21: inc, 10 sc, inc [14]
Row 22: inc, 12 sc, inc [16]
Row 23: inc, 14 sc, inc [18]
Row 24: inc, 16 sc, inc [20]
Rows 25-28: 20 sc [20]

Rotate 90 degrees and work on the first edge: ch 3 (=1 dc), 3 dc, ch 3, sl st.

Then along the curve/arch of the panties work the pattern: ch 2, 1 sc in next stitch (you get the flounce).

Then on the second edge: ch 3, 4 dc. I don't crochet ch 3 in the end, because I will join two edges of the panties.


I join the edges with sl sts. Fasten off, weave in the yarn. Join the same way the other edges.
Remember - the seam should be on the wrong side.


 |
| wrong side |
 |
| right side |
Finally I do the basting along the waist to tie the yarn and tighten the panties in waist.


STRIPE for the shoes:
red HDB, crochet hook 4 mm.
Insert the hook at the heel (centre part of the back leg, the edge of the shoe), work ch 20, wrap around the leg and sl st in the place you started. Sew the bow (pattern for the bow is below).


BOW - decoration for shoes
(ch 4, 3 dc in 4 th ch from the hook, ch 3, sl st) x 2
WATCH the tutorial on youtube.


Finally blush the cheeks and embroider the eyebrows.

The doll is finished.


Komentarze
Prześlij komentarz