Hi, this is part 2 of my project: STAR LOVE. Episode X: Together forever. In part 2 I give you FREE pattern for Han Solo. To familiarize with the project, watch my video on YouTube. Link is below. Have a great crocheting time and subscribe my blog & YouTube channel!
May the force be with you!
YouTube presentation of STAR LOVE project:
***
As a reminder: for crochet couple I mostly used YarnArt Jeans and crochet hook 2 mm (only for Han Solo's hair I used 2.5 mm).
With these materials dolls are 15 cm tall.
I crochet from legs to the body, head is made separately.
When I change yarn colors between rounds, I work invisible finish to make color changes less visible.
Materials (for Han Solo):
One skein of each yarn color is enough for the project.- Yarn Art Jeans
- beige - for skin
- dark beige - for Han Solo's shirt
- black - for Han Solo's shoes & vest
- blue jeans - for Han Solo's pants
- brown - for Han Solo's belt and gun holster
- to stabilize the head I use a piece of wire 2.5 mm in diameter and 20 cm long for each doll
Abbreviation in US terminology:
MR - magic ringch - chain
st - stitch
sc - single crochet
hdc - half double crochet
dc - double crochet
inc - increase
dec - decrease; sc2tog
***
HAN SOLO
Pattern for Han Solo's legs and body is similar to Leia's but includes some color modifications.Start from leg I.
LEG I
Black yarn
Rnd 1: ch 3, insert the hook in 2nd st from hook and work 1 sc, 5 sc in one st, 1 sc, 3 sc in last st [10]
Rnd 2: 10 sc [10]
In rnd 3 there is front part of shoes, where you have pattern (dec, 1 sc, dec) and the back part (3 sc).
Rnd 3: 1 sc, dec, 1 sc, dec, 1 sc, 3 sc [8]
Rnd 4-6: 8 sc [8]
Rnd 7: blue jeans, crochet in BLO: 2 sc, 4 inc, 2 sc [12]
Increases in rnd 7 and decreases in rnd 8 indicate knees.
Rnd 8: 2 sl st, 4 dec, 2 sl st [8]
Rnd 9: 8 sc [8]
Rnd 10: (3 sc, inc) x 2 [10]
Rnd 11: (4 sc, inc) x 2 [12]
Now cut the yarn and crochet LEG II in the same way, but then don't cut the yarn, because we'll join both legs.
JOINING LEGS
Continue with blue jeans yarn. In brackets there is number of leg.Rnd 12: 3 sc (II), ch 3 (bridge), 12 sc (I) - when you join with leg I, count 3 st from the marker and insert the hook; adjust the position to get front parts of shoes in the right place, 3 sc (bridge), 9 sc (II) [30]
Rnd 13-14: 30 sc
Rnd 15: (4 sc, inc) x 6 [36]
Rnd 16: crochet belt with brown, 36 hdc [36]
Rnd 17: start shirt, dark beige, 36 sc in BLO [36]
Rnd 18: (4 sc, dec) x 6 [30]
Rnd 19: 30 sc [30]
Rnd 20: (13 sc, dec) x 2 [28]
Rnd 21: (5 sc, dec) x 4 [24]
Rnd 22: (10 sc, dec) x 2 [22]
Rnd 23: (9 sc, dec) x 2 [20]
Rnd 24: crochet in BLO with beige (for skin) yarn: (8 sc, dec) x 2 [18]
Rnd 25: (4 sc, dec) x 3 [15]
Rnd 26: (1 sc, dec) x 5 [10]
Rnd 27: 10 sc [10]
Fasten off.
Now continue crocheting in FLO in rnd 24 to finish the dark beige shirt, but this time I work in rows. To make neckline mark centre point (regarding symmetry line) in front of you (red dot in the photo below) - this is starting point of neckline. Crochet in left direction (red arrow):
Row 24: dark beige, 20 sc, 1 tch, turn
Row 25: 20 sc, 3 tch, turn
Row 26: 20 dc
Fasten off.

To stabilize the head I used a piece of wire 2.5 mm in diameter and 20 cm long for each doll.
I bent the wire in half, shaped two loops (see the photos below), wrapped the ends with electrical tape and put into the head. Then I put the head with the wire into the body.

HEAD
Pattern for head is the same as Leia's. As a reminder:Rnd 1: 6 sc in MR [6]
Rnd 2: 6 inc [12]
Rnd 3: (1 sc, inc) x 6 [18]
Rnd 4: (1 sc, inc, 1 sc) x 6 [24]
Rnd 5: (3 sc, inc) x 6 [30]
Rnd 6: (2 sc, inc, 2 sc) x 6 [36]
Rnd 7: (5 sc, inc) x 6 [42]
Rnd 8: (3 sc, inc, 3 sc) x 6 [48]
Rnds 9-12: 48 sc [48]
From rounds 13 to 18 you will crochet cheeks (increases / decreases), so between these rounds keep marker straight, at the back of head. If it twists, work shift stitches.
Rnd 13: 12 sc, (1 sc, inc) x 5, 2 dec, (inc, 1 sc) x 5, 12 sc [56]
Rnds 14-17: 56 sc [56]
Rnd 18: 12 sc, (1 sc, dec) x 5, 2 sc, (dec, 1 sc) x 5, 12 sc [46]
Rnd 19: (21 sc, dec) x 2 [44]
Rnd 20: (20 sc, dec) x 2 [42]
Rnd 21: (5 sc, dec) x 6 [36]
Rnd 22: (2 sc, dec, 2 sc) x 6 [30]
Rnd 23: (3 sc, dec) x 6 [24]
Add stuffing. Insert the wire and crochet next rounds arounds the wire inside the head.


Rnd 24: (1 sc, dec, 1 sc) x 6 [18]
Add stuffing after inserting the wire to shape the head.
Rnd 25: 6 dec [12]
Rnd 26: (4 sc, dec) x 2 [10]
Rnd 27: 10 sc [10]
Fasten off, leave a tail for sewing head to the body.

Front part

Back part
ARM (make 2)
Rnd 1: beige, 6 sc in MR [6]Rnd 2-3: 6 sc [6]
Rnds 4-11: dark beige, 6 sc [6]
Rnd 12: 1 sc, 1 hdc, 2 dc, 1 hdc, 1 sc [6]
I didn't stuff the arms because they are stiff enough.

HAIR
YarnArt Samba brown color; crochet hook 2.5 mm
Rnd 1: 6 sc in MR [6]
Rnd 2: 6 inc [12]
Rnd 3: (1 sc, inc) x 6 [18]
Rnd 4: (1 sc, inc, 1 sc) x 6 [24]
Rnd 5: (3 sc, inc) x 6 [30]
Rnd 6: (2 sc, inc, 2 sc) x 6 [36]
Rnd 7-12: 36 sc [36]

EAR (make 2)
Insert the hook between rnds 15-16 on the side of head and work:ch 3, 2 dc in the same st, sl st in next st
Crochet the 2nd ear on the opposite side and then, after crocheting ears, try the hair, pin them to the head and sew.

NOSE
Firstly mark symmetry line - red head of a pin in the picture in rnd 13 between cheeks (between 2 dec) and rnd 18 (between 2 sc).
When you mark the symmetry line and nose it is also helpful to find proper place for eyes.
Embroider nose in rnd 16 (yellow head of a pin).

EYES
Eyes are embroidered with thin thread. Below I describe you eyes for Leia.I was inspired by many graphics of anime eyes and finally I drew version of woman and man eyes (picture below):


Woman eyes are wider than the man eyes.
Then I tried to transfer them onto crochet face.
Firstly I made outline with black thread.
Red pin indicates the symmetry line (I mention it in the NOSE section above).


Han Solo's eye involves two rnds in height (rnds 14-15) and width of 5 sc
Then I filled following colors: black - olive green (iris) - white and finally - outlines with black thread and reflexion.

To see more photos of embroidery steps - read the post:
STAR LOVE part 1 - FRAME + LEIA free pattern
***
HAN SOLO's VEST
Black yarnCrochet in rows. Start with ch 36 and 1 tch, turn [36]
Row 1-6: 36 sc, 1 tch, turn [36]
Row 7: (4 sc, dec) x 6, 1 tch, turn [30]
Row 8: 30 sc, 1 tch, turn [30]

Don't cut the yarn and continue working PART I of vest (1 tch in the end of each row):
Row 9: 7 sc [7]
Row 10: 2 sc, dec, 3 sc [6]
Row 11: 6 sc [6]
Row 12: 2 sc, dec, 2 sc [5]
Cut the yarn.
Skip 3 st (3 red dots on the scheme above) from PART I and work PART II (the back part) consisted of 10 sts.
Row 9: 10 sc [10]
Row 10: (3 sc, dec) x 2 [8]
Row 11-12: 8 sc
Cut the yarn.
Skip 3 st from PART II and work PART III (the same pattern as PART I).

Join three parts of vest:
Row 13: 5 sc (I), ch 2 (2 purple dots on the scheme above), 8 sc (II), ch 2, 5 sc (III)
Weave in loose ends as you go. Continue working scs around the vest to smooth the vest edges (if you wish).
I forgot to take photos of finished vest separately but you can look at Han Solo to see how he is handsome wearing it ;-)
BLASTER BELT HOLSTER
Perhaps it would be more convenient for you to make blaster first and adjust the holster to the blaster, so read BLASTER section first (below BLASTER BELT HOLSTER section).
You may work more chains in rnd 1 to adjust the holster opening - decide as you wish :-)
Rnd 1: ch 5, make a circle and work 5 scRnd 2: (2 sc, inc) x 2, 1 sc [7]
Rnd 3: 7 sc [7]
Rnd 4: (2 sc, inc) x 2, 1 sc [9]
Then crochet in rows:
Row 5: continue crocheting 4 sc and then work 1 tch, turn
Row 6: inc, 2 sc, inc [6]
Work chains enough to attach the belt to the waist at the back (I work ch 4) and then attach it with 1 sl st, hooking through the stitches of brown belt in rnd 16 (look at the photo below).

Come back along the ch 4 (work 4 sc) and then along the top part of holster (work 6 sc) and then on the other side work ch 4, attach to the clasp (in the front centre part of the belt) with 1 sl st, then come back along the chain (4 sc).


Fasten off, weave in loose ends.
Attach a piece of yarn around the thigh to secure the holster, embroider clasp with grey yarn and red stripes on the both sides of pants.


BLASTER
I also made blaster from brown and black polymer clay. I drew the blaster first:

Then I shaped particular elements of blaster (the size of blaster should be adjusted to the holster) and baked the clay in the oven.
When the clay get cold, I tried the blaster. In my project blaster didn't fit the holster initially but I broaden it a bit using pencil and it was OK.
Finally I attached the gun with black floss to the belt.


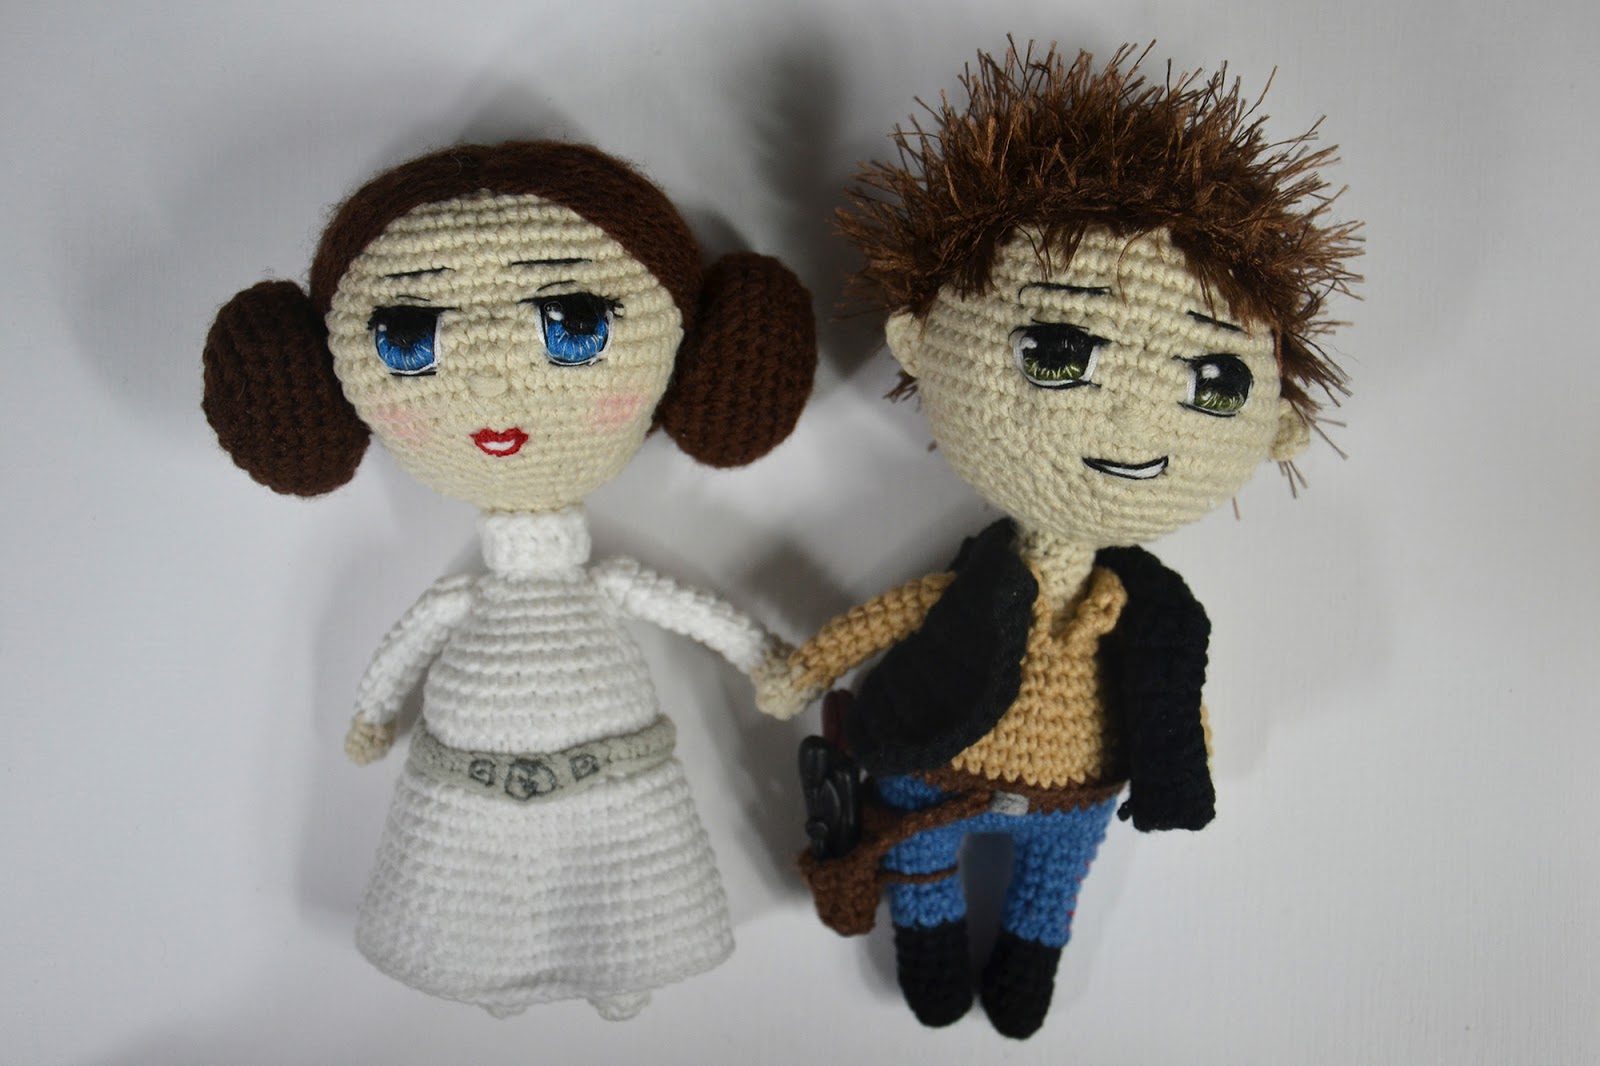
Han Solo is ready! With or without the vest he's looking gooood ;-)
Immodestly tell you, I love Leia & Han! Cause only I and my husband know, how much time I spent on that STAR LOVE project, especially eyes... The project was really nice challenge for me.
All the best for you!


Pattern for Leia is here: STAR LOVE part 1 - FRAME + LEIA free pattern
***
I love anime-style look, so I hope I will manage to do more dolls in this way ;-) That was the first one.Try the pattern and if something is unclear, please let me know.
Don't hesitate to leave a comment and share the link :-)
Subscribe my channel and blog, visit Facebook and have a great crocheting time!
I put lots of effort to create the projects, write down the patterns and make tutorials.
If you use my patterns, please attach info about the source - link to my YouTube or blog.
See you! :)

Komentarze
Prześlij komentarz