***
Slideshow is here on YouTube:Abbreviations (USA terminology):
- MR = magic ring
- st = stitch
- sl st = slip stitch
- sc = single crochet
- dc = double crochet
- ch = chain
- inc = increase - 2 sc in one stitch
- dec = decrease - 2 sc decreased to one stitch
- (..) = repeat the pattern in brackets given number of times
- [..] = total number of stitches at the end of the round / row
- rnd = round
- BLO = back loop only
- FLO = front loop only
Materials:
- YarnArt Jeans:
- pink for girl's dress and shoes
- light pink for dress (dots)
- blue for boy's pants and legs
- grey for boy's body
- black for boy's shoes and belt
- Acrylic brown and black yarn for hair
- Drops Baby Merino no 34 - for rug and heart.
- safety eyes
- crochet hook 2 mm
- wine stoppers, string, wooden beads (optional) for the swing
Dolls are about 10 cm tall and whole the project with the swing about 15 cm tall (without including the length of the string that can be adjusted to your needs).
***
HEAD (the same pattern for boy and girl)
BeigeRnd 1: 6 sc in MR [6]
Rnd 2: 6 inc [12]
Rnd 3: (1 sc, inc) x 6 [18]
Rnd 4: (1 sc, inc, 1 sc) x 6 [24]
Rnd 5: (3 sc, inc) x 6 [30]
Rnds 6-10: 30 sc [30]
Now I insert safety eyes - eyes are between rnds 7-8 (space between the eyes = 2 sc).


Rnd 11: (3 sc, dec) x 6 [24]
Rnd 12: (1 sc, dec, 1 sc) x 6 [18]
Rnd 13: (1 sc, dec) x 6 [12]
Cut the yarn, make invisible finish - the head is ready!

Now add new yarn for the body - pink for girl and grey for boy.
GIRL'S BODY - dress
pink = Plight pink = LP
When it is written e.g. (2 P, 1 LP) x 8, it means I work 2 sc in pink, 1 sc in light pink and repeat the pattern 8 times.
Rnd 1: pink, 12 sc [12]
Rnd 2: (1 sc, inc) x 6 [18]
Rnd 3: (2 sc, inc) x 6 [24]
Rnd 4: (2 P, 1 LP) x 8 [24]
Rnd 5: pink, 24 sc [24]
Rnd 6: 1 P, 1 LP, (2 P, 1 LP) x 7, 1 P [24]
Rnd 7: pink, 24 sc in BLO [24] Later in rnd 7 I will crochet skirt in FLO
Rnd 8: 24 sc [24]
Rnd 9: (2 sc, dec) x 6 [18]
Rnd 10: (1 sc, dec) x 6 [12]

SKIRT
Rnd 7: FLO 24 sc [24]Rnd 8: (2 sc, ch 1, 2 sc) in 1st st, skip 2nd st, (1 dc, ch 1, 1 dc) in 3rd st, skip 4th st.
Pattern consists of 4 stitches - repeat the pattern 6 times.

BOY'S BODY
Rnd 1: grey, 12 sc [12]
Rnd 2: (1 sc, inc) x 6 [18]
Rnd 3: (2 sc, inc) x 6 [24]
Rnd 4-6: 24 sc [24]
Cut the yarn, make invisible finish and change to black.
Rnd 7: black (for belt), 24 sc [24]
Cut the yarn, make invisible finish and change to blue.
Rnd 8: blue (for pants), 24 sc [24]
Rnd 9: (2 sc, dec) x 6 [18]
Add stuffing.
Rnd 10: (1 sc, dec) x 6 [12]
Fasten off.

PALM (make 2)
Beige yarn for both girl and boy.Rnd 1: 6 sc in MR [6]
Rnd 2: 6 sc [6]
Rnd 3: 3 dec [3]
Fasten off, cut the yarn, weave in loose ends.
ARM (make 2)
Pink for girl, grey for boy.
Insert the hook between rnds 2-3 on the side of the body and work ch 6.

Then hook through the palm and make sl st.


Back along the chain with sl sts.

Finally hook into the body and work sl st.
Fasten off, cut the yarn, weave in loose ends.
SHOE (make 2)
Pink for girl and black for boy.Rnd 1: 6 sc in MR [6]
Rnd 2: (2 sc, inc) x 2 [8]
Rnd 3: (2 sc, dec) x 2 [6]
Rnd 4: 3 dec [3]

Girl's shoes

Boy's shoes
LEG (make 2)
Beige for girl and blue for boy.Insert the hook on the bottom of the body (where legs shoud be) and work ch 7.
Then hook through the shoe and make sl st.
Back along the chain with sl sts.
Finally hook into the body and work sl st.
Fasten off, cut the yarn, weave in loose ends.


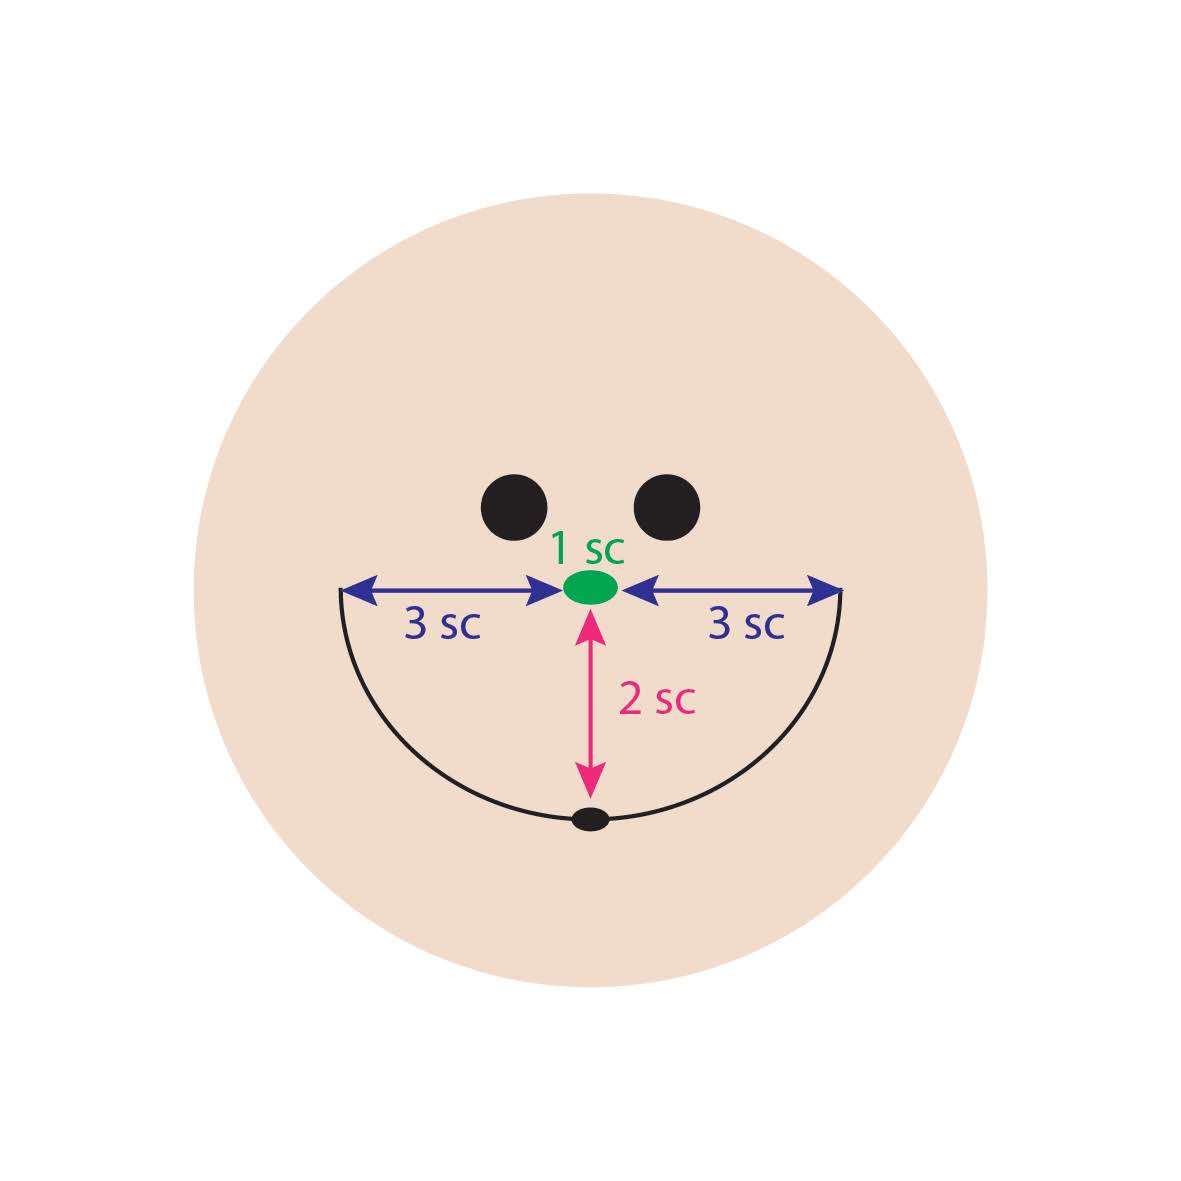
FACE DETAILS
Firstly embroider nose, smile and eyebrows.Below in brackets there are colors described in the scheme:
- nose = 1 sc (green),
- space between nose and cheeks = 3 sc (blue),
- space between nose and bottom point of smile = 2 sc (red)
Then I embroider cheeks using woven wheel stitch.
In my tutorial about four leaf-clover I explain you how to embroider cheeks, so I recommend you to watch it.
In my tutorial about four leaf-clover I explain you how to embroider cheeks, so I recommend you to watch it.
In short:
Start with embroidering 5 straight stitches - star shape.

Insert the tapestry needle in the middle and weave below and above the star lines (step 1-6 in the pictures below).
Repeat until you get a wheel.
Fasten off, weave in loose ends.
Embroider the cheek on the other side.

Ears for boy
After you crochet ears you can place the hair (read the HAIR section below).
HAIR
Black for girl and brown for boy (acrylic yarn is better to brush up).Rnd 1: 6 sc in MR [6]
Rnd 2: 6 inc [12]
Rnd 3: (1 sc, inc) x 6 [18]
Rnd 4: (1 sc, inc, 1 sc) x 6 [24]
Rnd 5: (3 sc, inc) x 6 [30]
Rnds 6-8: 30 sc [30]

Boy's hair
Finally brush up boy's hair.
For girl's hair I attached pieces of yarn around the black part to make long hair in two plaits (remember about the pairting). I cut pieces of yarn about 16 cm and bend them in half.
Look at the photos below to get the idea how I fasten the piece of yarn (the way is similar I attach fringe):


SWING (made from wine stoppers and string)
I cut wine stoppers into circle about 7-8 mm in width. Then I arranged the stoppers and tie up with a piece of string (I thread the needle and insert it in the centre of each circle). I cut two longer parts for armrest.Finally I inserted the needle (thread with string) in two points of sides to enable hanging the swing on the wall.


Then insert strings through the rug to make it stable:

I gathered two parts of string on each side and made chains with crochet hook.
RUG (knitting)
I used Drops Baby Merino no 34.k - knit
p - purl
Cast on 12 st and work in rows:
Row 1: k12
Row 2: p12
Repeat until you get the length you want.
Bind off.
You can attach fringe on both sides.


HEART balloon
I used the same yarn as for the rug, crochet hook 2 mm.

Piece I
Rnd 1: 6 sc in MR [6]
Rnd 2: 6 inc [12]
Rnd 3: 12 sc [12]
Cut the yarn, fasten off (I make invisible finish) and crochet in the same way piece II but don't cut the yarn because we will join piece I and II.
Rnd 4: 1 sc (II), insert the hook in 2nd st (II) and 1st st (I) and crochet 1 sc, 10 sc (I),insert the hook into 12th st (I) and 3rd st (II) and crochet 1 sc, 9 sc (II) [22]

Rnd 5: (9sc, dec) x 2 [20]
Rnd 6: (3 sc, dec) x 4 [16]
Rnd 7: 8 dec [8]
Rnd 8: 4 dec [4]
Fasten off, close the opening, weave in loose yarn ends.
You can also make the heart in different way like my Valentine's little heart
Sew the heart into the swing's string and attach the floss to the heart.
Rnd 6: (3 sc, dec) x 4 [16]
Rnd 7: 8 dec [8]
Rnd 8: 4 dec [4]
Fasten off, close the opening, weave in loose yarn ends.
You can also make the heart in different way like my Valentine's little heart
Sew the heart into the swing's string and attach the floss to the heart.
Have a nice crocheting and lots of love!
***
Don't hesitate to leave a comment and share the link :-)I put lots of efforts to create the projects, write down the patterns and make tutorials.
If you use my patterns, please attach info about the source - link to my YouTube or blog.
Subscribe my channel and blog, visit Facebook and have a great crocheting time!
See you! :)
Komentarze
Prześlij komentarz